图像处理是一种数学计算。数字图像由称为像素的彩色小点组成。每个像素由红、绿、蓝(RGB)三个独立的颜色组成。每个像素中的主色由每个RGB分量的数值决定。
本文将介绍10个使用使用NumPy就可以进行的图像处理步骤,虽然有更强大的图像处理库,但是这些简单的方法可以让我们更加熟练的掌握NumPy的操作。
我们首先使用pillow读取图像
import numpy as np#Use PIL to access image datafrom PIL import Imageimg = Image.open('monalisa.jpg')#Create array from image data M = np.array(img)#Display array from image data display(Image.fromarray(M))
1、缩小图像def reduce_image_size_by_n(image, n): # Get the height and width of the image height, width, channels = image.shape # Reduce the height and width by n new_height = height // n new_width = width // n # Create a new array to store the reduced image downsampled_image = np.zeros((new_height, new_width, channels), dtype=image.dtype) # Iterate over each pixel of the reduced image for i in range(new_height): for j in range(new_width): # Take every other pixel along each axis to reduce the image downsampled_image[i, j] = image[n*i, n*j] return downsampled_image#Try the function using n = 2reduced_M = reduce_image_size_by_n(M, 2)display(reduced_M)

def flip_image(image): # Takes all rows in image (:) and reverses it the order of columns (::-1) flip_image = image[:, ::-1] return flip_image#Try function using reduced imagedisplay(flip_image(reduced_M))

def rotate_image (image, n): # rotate image using rot90, use n to determine number of rotation rotated_img = Image.fromarray(np.rot90(image, k=n, axes=(1, 0))) return rotated_img#rotate image twice (n=2)display(rotate_image(reduced_M, 2))

def crop_image(image, crop_ratio, zoom_ratio): #create focused part using crop_ratio and zoom_ratio of choice top = image.shape[0] // crop_ratio bottom = zoom_ratio * image.shape[0] // crop_ratio left = image.shape[1] // crop_ratio right = zoom_ratio * image.shape[1] // crop_ratio # Extract the focused part using array slicing focused_part = image[top:bottom, left:right] return focused_partdisplay(crop_image(reduced_M, 4, 2))

def RGB_image(image,image_color): if image_color == 'R': #make a copy of image for the color channel img_R = image.copy() #set other color channel to zero. Here Red is the first channel [0] img_R[:, :, (1, 2)] = 0 return img_R elif image_color == 'G': img_G = image.copy() #set other color channel to zero. Here Green is the second channel [1] img_G[:, :, (0, 2)] = 0 return img_G elif image_color == 'B': img_B = image.copy() #set other color channel to zero. Here Blue is the third channel [2] img_B[:, :, (0, 1)] = 0 return img_B
查看红色通道
M_red = Image.fromarray(RGB_image(reduced_M, 'R'))display(M_red)

绿色
M_green = Image.fromarray(RGB_image(reduced_M, 'G'))display(M_green)

蓝色
M_blue = Image.fromarray(RGB_image(reduced_M, 'B'))display(M_blue)

这里使用棕褐色(Sepia)作为示例,可以根据不同的要求修改转换矩阵
def apply_sepia(image): # Sepia transformation matrix sepia_matrix = np.array([[0.393, 0.769, 0.189], [0.349, 0.686, 0.168], [0.272, 0.534, 0.131]]) # Apply the sepia transformation sepia_img = image.dot(sepia_matrix.T) # Using matrix multiplication # Ensure values are within valid range [0, 255] sepia_img = np.clip(sepia_img, 0, 255) return sepia_img.astype(np.uint8)# Apply sepia effectM_sepia = Image.fromarray(apply_sepia(reduced_M))display(M_sepia)

灰度化可以简单的理解为将RBG三个通道合并成一个黑白的通道
import numpy as npdef grayscale(image): # Convert the RGB image to grayscale using weighted average grayscale_img = np.dot(image[..., :3], [0.2989, 0.5870, 0.1140]) # Ensure values are within valid range [0, 255] grayscale_img = np.clip(grayscale_img, 0, 255) # Convert to uint8 data type grayscale_img = grayscale_img.astype(np.uint8) return grayscale_img# Convert the image to grayscaleM_gray = grayscale(reduced_M)display(M_gray)

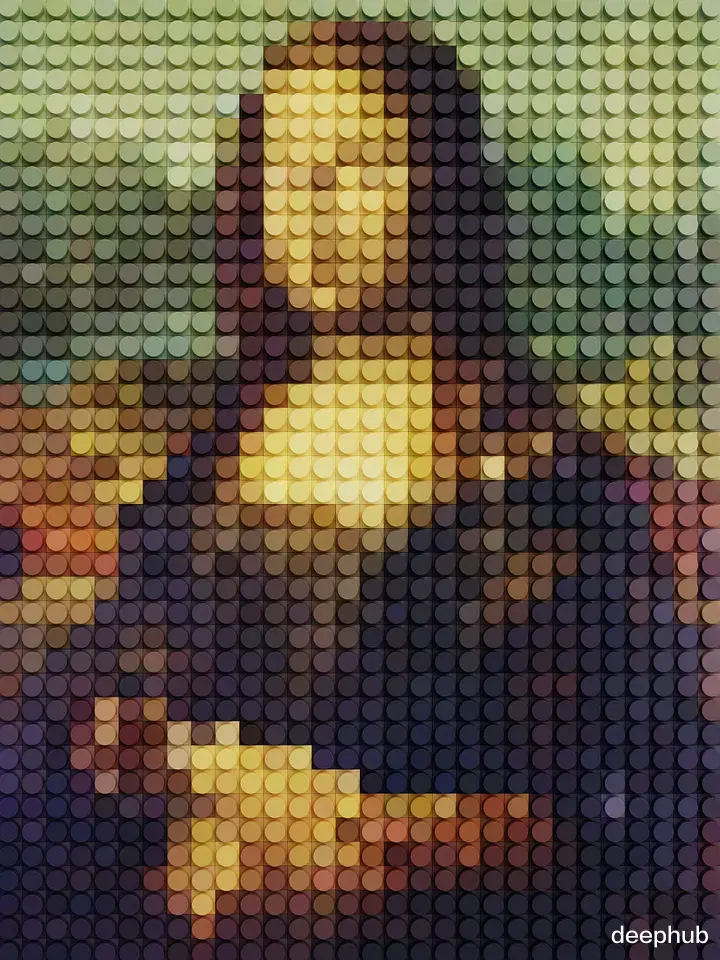
像素是一个一个色块组成的,像素化顾名思义就是将图像分成一定的区域,并将这些区域转换成相应的色块,再有色块构成图形。类似于色彩构图。简单来说,就是把矢量图形转换成像素点组成的点阵图形,也叫栅格化。
def pixelate_image(image, block_size): # Determine the number of blocks in each dimension num_blocks_y = image.shape[0] // block_size num_blocks_x = image.shape[1] // block_size # Calculate the average color for each block block_means = np.zeros((num_blocks_y, num_blocks_x, 3), dtype=np.uint8) for y in range(num_blocks_y): for x in range(num_blocks_x): block = image[y * block_size: (y + 1) * block_size, x * block_size: (x + 1) * block_size] block_mean = np.mean(block, axis=(0, 1)) block_means[y, x] = block_mean.astype(np.uint8) # Upsample block means to original image size pixelated_image = np.repeat(np.repeat(block_means, block_size, axis=0), block_size, axis=1) return pixelated_image# Set the block size for pixelation (adjust as needed)block_size = 10# Pixelate the imageM_pixelated = Image.fromarray(pixelate_image(reduced_M, block_size))display(M_pixelated)

更通俗的的讲就是我的世界风格的图像
9、二值化(Binarize)二值化是将数值型特征取值阈值化转换为布尔型特征取值,或者通俗的讲就是设定一个阈值,超过阈值设置成ture,否则设置成false
def binarize_image(image, threshold): #set pixel value greater than threshold to 255 binarize_image = ((image > threshold) * 255).astype(np.uint8) return binarize_image#set thresholdthreshold = 68M_binarized = Image.fromarray(binarize_image(reduced_M, threshold))display(M_binarized)

最简单的图像同和方法就是根据不同的透明度,对2张图象的像素求和相加,如下所示
#import and resize second image img_2 = np.array(Image.open('Eiffel.jpg').resize(reduced_M.shape[1::-1])) def blend_image(image1, image2, , visibility_2 ): #blend images by multiplying by visibility ratio for each image blend_image = (image1 * visibility_1 + image2 * visibility_2).astype(np.uint8) return blend_imagemodified_image = Image.fromarray(blend_image(reduced_M, img_2, 0.7, 0.3))display(modified_image)

对于图像的操作其实就是对于图像进行数组操作的过程,我们这里展示的一些简单的操作只是为了熟悉Numpy的操作,如果需要更加专业的操作请使用更加专业的库,例如OpenCV或者Pillow。
https://avoid.overfit.cn/post/da27bd78da0b4d76b639c0f9810fb6e0
作者:Ayo Akinkugbe
